

Lasers can be used as a special type of illumination in machine vision. The laser beam can take on various shapes, which are generated by diffractive optical elements, with the exception of point or line shapes.
The projected laser light patterns can be used to perform inspections and measurements on the image that are not possible with conventional types of illumination.
Laser light is a sharply focused beam of light that can be imaged very accurately over long working distances. The extremely focused light precisely reproduces the light pattern that can now be processed in the camera image.

A simple line can be used to inspect the profile of an elongated workpiece.

The three-dimensional shape of a metal component is made visible by a laser grid.

Using a multi-line, the shape of the part can be measured in several places at the same time.
While standard lighting produces a two-dimensional image (X/Y), lasers can often be used to obtain information about spatial contours (Z-axis). Analysing the spatial offset of obliquely projected laser lines and other patterns is known as laser triangulation.
Lasers can be used for a wide range of applications. In most cases, a little imagination is all that is needed to design this somewhat unusual type of lighting. Typical applications include detecting objects, positioning components, identifying different objects and recognising contours.
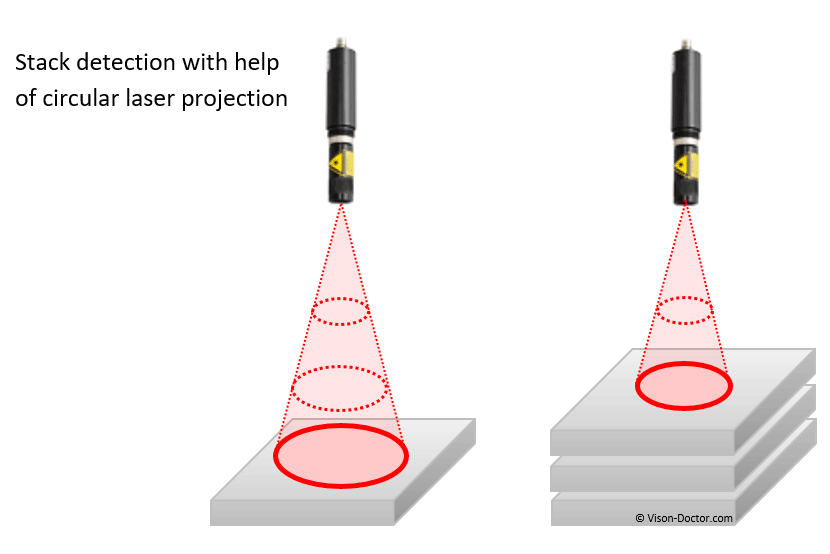
A vertically projected circle appears in the camera image in different sizes depending on the height of the object. From the diameter of the circle, it is very easy to determine the height and working distance of the object. For example, it is possible to see how many layers are left on a pallet.

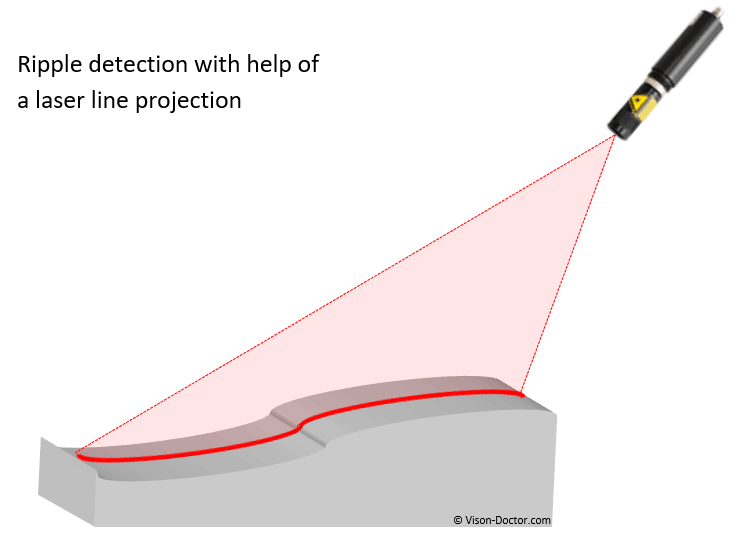
One or more laser lines are projected at an angle onto a flat material such as paper, film, etc. If the material is curled, folded or bent, the laser line will be curled or bent accordingly. Due to the homogeneity of the material, this cannot be seen in the normal camera image with diffuse incident light. This could be used to detect material jams in the production line.

Gap and offset measurements based on the principle of laser triangulation on sheet metal parts and assemblies etc. are frequently done in the automotive industry. One or more lines are projected and the line offset, shape and length of each segment are measured.
Gap measurements and flush tests based on the principle of laser triangulation on sheet metal parts and assemblies etc. are frequently realised in the automotive industry. One or more lines are projected and the line offset, shape and length of the individual segments are measured.
Three-dimensional data and images of objects can be generated using a line laser, a 3D camera for determining triangulation profiles and a movable scanning unit. This is one of many possibilities for 3D image processing.

Red laser line with ambient light - laser line is sometimes difficult to see on object surface.

Interfering ambient light (like fluorescent tubes) is almost completely blocked. Only the bright laser line remains visible.
For more complex, metrically calibrated inspections, ready-made laser triangulation systems are available that have been developed precisely for such and far more difficult tasks. Further information can be found in the Laser triangulation systems chapter.
Vision-Doctor.com is a private, independent, non-commercial homepage project and not a technology provider or system integrator. Suitable technologies and further professional support can be obtained from the companies & partners listed below.
If necessary, I will be happy to provide a quick recommendation, contacts and brief information.
