Illumination
Lighting techniques for machine vision
Interaction of light, object and camera
Depending on the surface of the material, different effects occur. Some of the incident light is absorbed, some is reflected and some is scattered, depending on the surface of the material. In the case of opaque, semi-transparent or translucent materials, light can also pass through the body (transmission). In some cases, light is even polarised or diffracted at the surface.
Usually one of these effects never occurs alone; it is always a combination of several effects. Even an optically high-quality mirror reflects only about 95% of the incident light.

Properties of illumination
The possible lighting parameters and the various lighting techniques are described below. These must be selected in such a way that, together with the material properties of the test object, they produce a perfectly analysable image.
Light can...
- incide on the test object at a certain angle of incidence
- have a certain colour (red, green, blue, white with a particular colour temperature, infrared, ultraviolet)
- be direct or diffuse
- have coherent light properties (laser)
Angle of incidence of the illumination
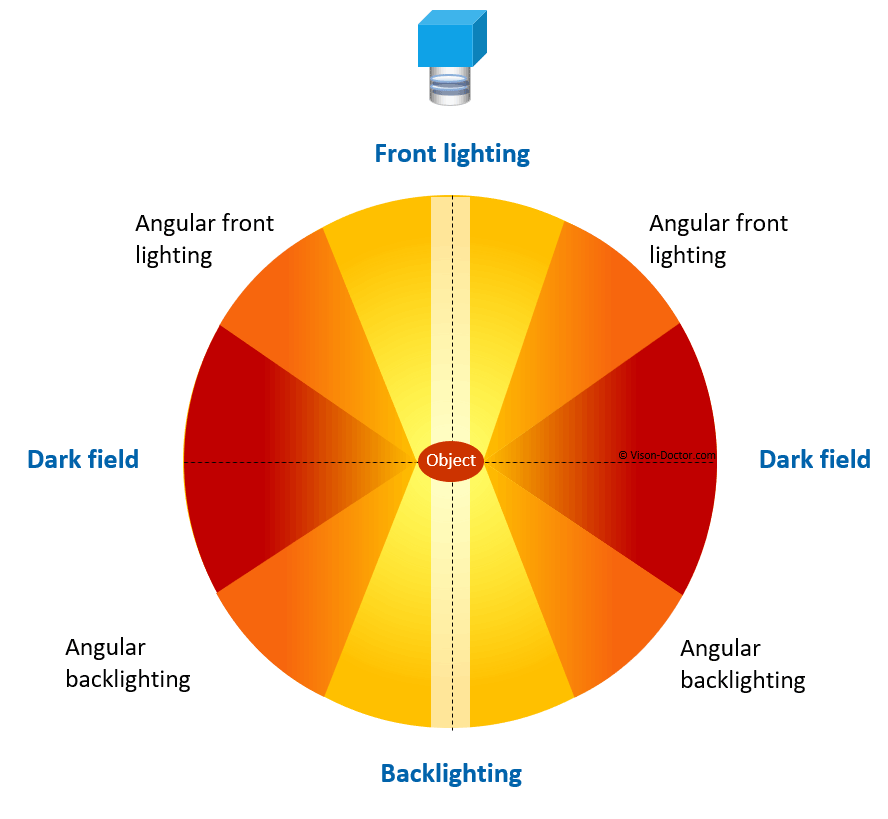
An important method is to use light from different spatial directions.
The light can be directed at the specimen from above, at an angle from one side or from the side, flatly incident or from the opposite side. Depending on the surface shape, material properties and structure, the light will be scattered, absorbed, reflected, transmitted or even create a shadow on the body and its test features. In addition to the direction of illumination, it is very important whether the light is parallel or diffuse.
Different lighting angles

Classic lighting techniques:
Direct top light
direct incident light: Light from top, no diffuser
Diffuse lighting
diffuse incident lighting is generated by additional diffusers and is less directional. This also refers to dome and coaxial lighting.
Lateral light
lateral light at angles, directly directed light bars, also ring-shaped, also diffuse
Dark field
illumination at a shallow angle from all sides: dark field
Backlight
Illumination is used to illuminate the object from behind (Backlight (transmitted light)

Direct front light
Direct illumination causes strong reflections on surface

Diffuse lighting from top
Diffuse illumination create a homogenous lighting situation

Bright field
Side-aligned illumination creates dark rippled border and matte surface

Sloped dark field
Side orientated with lower angles emphasizes contur edges and little light on surface

Dark field with low angle
Extremely flat orientated illumination emphasizes the contour edges

Backlight
Light from below / opposite site of camera results in a silhouette of the object
Need machine vision lighting ?
Vision-Doctor.com is a private, independent, non-commercial homepage project and not a technology provider or system integrator. Suitable technologies and further professional support can be obtained from the companies & partners listed below.
If necessary, I will be happy to provide a quick recommendation, contacts and brief information.


